🌿Complete Guide to gRPC + Kestrel Self-Signed Certificates: From Concepts to Practice
Introduction
This article is a learning note I compiled after encountering SSL certificate issues while developing a gRPC + Kestrel project.
If you're like me, using .NET's Kestrel as your gRPC Server and want to enable HTTPS encrypted connections, you'll definitely face this question: How do you generate a test certificate?
This article will start from the fundamentals and guide you through the entire process step by step.
Table of Contents
- Concepts: Why Does the Server Need a Certificate?
- Tools: PowerShell vs. IIS Management Console
- Practice: Generating a Test Certificate (PFX)
- Client-Side: Setting Up Thumbprint Verification
- Cleanup: Removing Test Certificates
Concepts: Why Does the Server Need a Certificate?
This is where I got confused when learning.
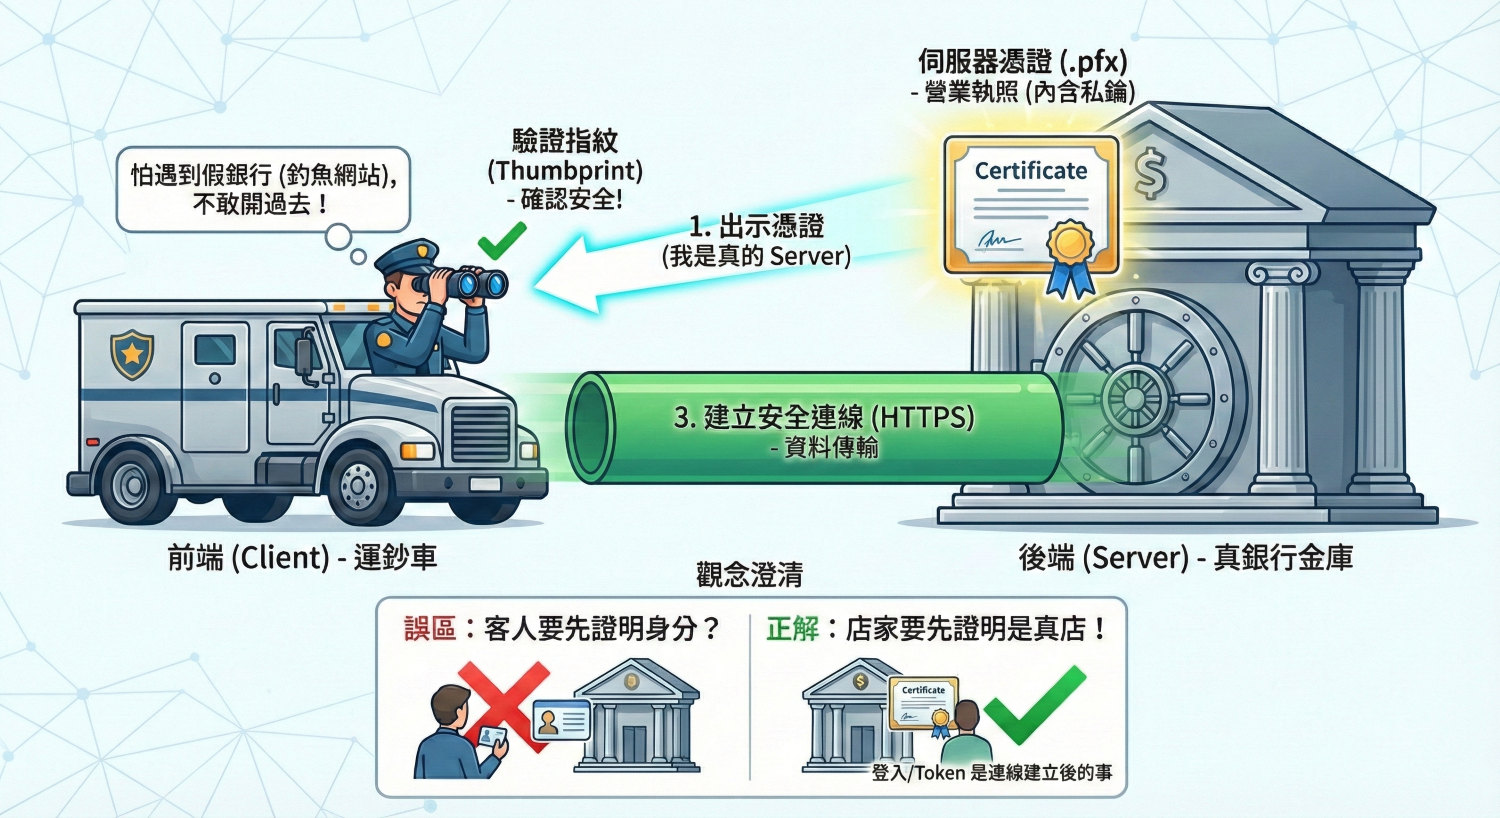
Intuitively, we tend to think: "I'm the client (UI), I want to connect to the server, so shouldn't I be the one presenting credentials to prove 'who I am'?"
But in the world of HTTPS/TLS, the logic is reversed.
Fake Bank vs. Real Bank
Imagine your UI (frontend) is an armored truck, and your Server (backend) is a bank vault. You want to deliver money (data) to it.
| Role | Analogy | Verification Purpose |
|---|---|---|
| Server | Bank Vault | Present a "business license (certificate)" to prove it's a real bank |
| Client | Armored Truck | After connection is established, prove identity via username/password/Token |
What does the armored truck driver fear most? Driving to the wrong place and handing money to scammers pretending to be a bank!
So the Bank (Server) must hang a "government-issued business license (certificate)" at the front door. The armored truck driver (UI) looks at that license from afar with binoculars: "Okay, this is a real bank, not a fake set." Only after confirming it's safe does the armored truck dare to establish a connection.
SSL Handshake Process
When Does a Client Need a Certificate?
If you have this question, that's called Mutual TLS (mTLS). Military systems or internal banking core systems use this approach, requiring both parties to present certificates.
But this is very rare in general application development because management is too cumbersome (every client computer needs a certificate installed).
Simple way to remember: HTTPS is like a Server opening a store and hanging its "business license (certificate)" at the door for you to see before you dare to enter and shop.
Tools: PowerShell vs. IIS Management Console
This is a classic "CLI (command line) vs GUI (graphical interface)" question.
Core Differences Comparison
| Feature | PowerShell | IIS Management Console |
|---|---|---|
| Precision | ⭐⭐⭐⭐⭐ Very High | ⭐⭐ Low |
| Customization | Can customize expiry (5 years), multiple domains (SAN), password strength | Almost no customization (default 1 year) |
| Environment Requirements | Built into Windows (no extra installation needed) | Must install IIS (Web Server) to use |
| Automation | ✅ Can be scripted for one-click execution | ❌ Must click manually |
| Primary Use Case | Developers, DevOps automation | System administrators for quick setup |
Why Is IIS Console Not Suitable for gRPC Projects?
Fatal Flaw A: Missing "Subject Alternative Name (SAN)"
- IIS-generated: Usually only sets
Subject = localhost - Modern Standard: Chrome and .NET Core no longer look at Subject; they look at SAN (Subject Alternative Name)
- Result: gRPC Client still throws "invalid certificate" error when connecting
The -DnsName "localhost", "127.0.0.1" in the PowerShell command is setting the SAN.
Fatal Flaw B: Using a Sledgehammer to Crack a Nut
Your architecture uses Kestrel (a self-hosted server).
Installing the massive IIS (Internet Information Services) just to generate a certificate is like raising a cow just to drink a glass of milk.
Conclusion: For modern .NET Core gRPC running on Kestrel, PowerShell is your only correct choice.
Practice: Generating a Test Certificate (PFX)
Step 1: Run the PowerShell Script
- Search for PowerShell in Windows Start menu
- Right-click → "Run as Administrator"
- Copy the entire code block below, paste it into PowerShell and press Enter
# --- Configuration Section ---
$pfxPassword = "m1234"
$pfxFileName = "server_cert.pfx"
$friendlyName = "[Dev_Cert_DoNotTrust]"
$outputDir = "C:\Temp\LCerts"
# -----------------------------

# 1. Create temp directory
if (!(Test-Path $outputDir)) {
    New-Item -ItemType Directory -Path $outputDir | Out-Null
}

$pfxPath = Join-Path $outputDir $pfxFileName
Write-Host "Generating test business license..." -ForegroundColor Cyan

# 2. Generate self-signed certificate
$cert = New-SelfSignedCertificate `
    -DnsName "localhost", "127.0.0.1" `
    -CertStoreLocation "Cert:\CurrentUser\My" `
    -FriendlyName $friendlyName `
    -KeyExportPolicy Exportable `
    -KeySpec KeyExchange `
    -NotAfter (Get-Date).AddYears(5)

# 3. Export as .pfx
$passwordSecure = ConvertTo-SecureString $pfxPassword -AsPlainText -Force
Export-PfxCertificate -Cert $cert -FilePath $pfxPath -Password $passwordSecure

# 4. Display results
Write-Host "`n★ Success! Certificate generated!" -ForegroundColor Green
Write-Host "File location: $pfxPath" -ForegroundColor Yellow
Write-Host "File password: $pfxPassword" -ForegroundColor Yellow
Write-Host "Thumbprint: $($cert.Thumbprint)" -ForegroundColor Magenta
Step 2: Deploy to Your Project
- Open your Visual Studio project folder
- In your backend project, create a
Configfolder - Copy
C:\Temp\Certs\server_cert.pfxinto it - In Visual Studio:
- Select the
.pfxfile - In the "Properties" window, find "Copy to Output Directory"
- Change to "Copy if newer"
- Select the
Step 3: Update Configuration Files
Backend Config:
UseSsl = true
CertPath = @".\Config\server_cert.pfx"
CertPassword = "m1234"
Frontend Config:
UseSsl = true
AllowInsecure = false
Thumbprint = (paste the thumbprint shown by PowerShell)
Client-Side: Setting Up Thumbprint Verification
Concept Unlock: Why Doesn't the Client Need the PFX File?
"The PFX file has a thumbprint, of course, but the client doesn't need the PFX file — it only needs to know that 'thumbprint number'."
Imagine you're a "concert ticket checker (frontend Client)", and the backend Server is a "VIP ticket holder":
- Backend (Server): Holds the original VIP ticket (PFX file)
- Frontend (Client): Has a list from the organizer saying "Today's VIP ticket number is A1B2C3... (thumbprint)"
When the backend comes and shows their ticket, you just check if the ticket number matches the list, then let them through.
Implementation Steps
Finding the Thumbprint
If you closed the PowerShell window, use this command to check again:
Get-ChildItem -Path Cert:\CurrentUser\My | Where-Object { $_.FriendlyName -like "*LCS*" }
Configure Client Config
Open ConnectionList.xml:
<ConnectionInfo
    Name="Local_Dev_Secure"
    Ip="127.0.0.1"
    Port="5006"
    UseSsl="true"
    AllowInsecure="false"
    Thumbprint="A1B2C3D4E5F678901234567890ABCDEF12345678" />
| Property | Description |
|---|---|
UseSsl="true" |
Tell the armored truck to use HTTPS channel |
AllowInsecure="false" |
Tell the armored truck to verify strictly |
Thumbprint="..." |
Tell the armored truck to only allow those with this ID |
Cleanup: Removing Test Certificates
Knowing how to clean up after testing and keeping your development environment tidy — that's the mark of a professional engineer.
Method 1: PowerShell Quick Removal (Recommended)
# --- Configuration Section ---
$targetFriendlyName = "[Dev_Cert_DoNotTrust]"
$tempPfxPath = "C:\Temp\Certs\server_cert.pfx"
# -----------------------------

Write-Host "Searching and removing test certificates..." -ForegroundColor Cyan

# 1. Remove from Windows certificate store
$certs = Get-ChildItem -Path "Cert:\CurrentUser\My" | Where-Object { $_.FriendlyName -eq $targetFriendlyName }

if ($certs) {
    foreach ($c in $certs) {
        Remove-Item -Path $c.PSPath
        Write-Host "✅ Removed certificate from Windows store: $($c.Thumbprint)" -ForegroundColor Green
    }
} else {
    Write-Host "⚠️ Certificate not found in store" -ForegroundColor Yellow
}

# 2. Remove temp file
if (Test-Path $tempPfxPath) {
    Remove-Item -Path $tempPfxPath -Force
    Write-Host "✅ Deleted temp file: $tempPfxPath" -ForegroundColor Green
}

Write-Host "`nComputer restored to clean state!" -ForegroundColor Cyan
Method 2: Manual GUI Removal
- Press
Win + R, typecertmgr.msc, press Enter - On the left, expand "Personal" → "Certificates"
- Find the one where "Issued To" is
localhostand "Friendly Name" is[Dev_Cert_DoNotTrust] - Right-click → Delete
Method 3: Clean Up Project Residuals
Don't forget to delete Config\server_cert.pfx from your project directory!
The PowerShell script only deletes the original file in C:\Temp, not the copy in your project.
Summary
| Step | Description |
|---|---|
| 1 | Understand that certificates are for the Server |
| 2 | Use PowerShell to generate a self-signed certificate |
| 3 | Copy the .pfx to your backend project |
| 4 | Paste the thumbprint into the frontend config |
| 5 | Remember to clean up after testing |
Now, your backend is a bank with a valid (test) license, and your frontend is an armored truck with the correct thumbprint verification code.
Press F5 and launch it!
- first edition time: 2026-01-31