🌿Teaching You How to Install the SDD Spec Kit and Upgrade It: Building the Spec Kit Environment with PowerShell
[!NOTE] About This Article This article reorganises the earlier Windows setup material around the thing that actually matters most: the toolchain required for Spec-Driven Development. PowerShell still matters here, but mainly as the entry point and operating surface. The real centre is Spec Kit and the workflow it brings into a repository.
Introduction
Some nights, terminal windows light up one by one until the desktop begins to feel like a corridor of small rooms. You started out meaning to install one tool, and then PowerShell appeared, then uv, then pipx, then Node.js, then an AI coding agent, and finally a command called specify. Every name sounds useful. The problem is that when they stand too close together, their roles blur.
So this article is not here to hand you one more block of commands and disappear. It is here to pull the frame wider again. Put PowerShell back where it belongs. Put uv and pipx back where they belong. Put Spec Kit back at the centre of the Spec-Driven Development workflow it was built to support. Once the positions settle, installation and upgrades stop feeling like a district full of illuminated signs with no street names.
If you came in through PowerShell, this article will still teach you a few commands worth keeping in your hands. But the centre has shifted on purpose: this is an SDD toolkit installation and upgrade guide. PowerShell is the language you pick up on the way. It is not the main subject. If you want the deeper PowerShell 7 material, there is a companion article under the same tag waiting at the end.
Table of Contents
- What the real main subject is
- Installing the SDD and Spec Kit toolchain on Windows
- What Spec Kit actually adds after installation
- How to upgrade an existing installation
- The PowerShell commands worth learning on the way
- What PowerShell, uv, and pipx each are
- Verification and further reading
- If the CLI really breaks: refresh from the release zip
What the real main subject is
It helps to say this plainly at the start: the main subject here is not PowerShell. It is the toolchain required to make Spec-Driven Development usable on Windows.
By SDD, I mean Spec-Driven Development. It is not just a way to ask AI for more code. It is a way to move through principles, specifications, plans, tasks, and implementation with more structure and less drift. GitHub's Spec Kit is the open-source toolkit built around that idea.
That is why the real problem on Windows is not merely whether you know how to type a PowerShell command. It is whether the layers underneath are in the right places:
- You need a modern shell that can handle current syntax and scripts.
- You need a proper installer for Python CLI tools, such as
uvorpipx. - You need Git, Node.js, and the AI coding agent you plan to pair with Spec Kit.
- You need to understand what
specifyadds to a repository, and what an upgrade may overwrite.
That is why the order of this article is different from a general shell tutorial. First, the SDD and Spec Kit path. Then the PowerShell commands that help you walk it.
Installing the SDD and Spec Kit toolchain on Windows
This is the real centre of the article. The aim is not to build a generic Windows development machine. The aim is to prepare the smallest complete environment that Spec Kit expects on Windows.
Step 1: Choose the installation path that fits your machine
Here is the direct answer first: no, Spec Kit does not require Scoop.
What the official docs actually list as prerequisites are uv or pipx, Python 3.11+, Git, and a supported AI coding agent. Scoop is simply one very convenient Windows path because it happens to install pwsh, git, uv, ripgrep, nvm, and Windows Terminal in one tidy flow. But if you prefer to stay closer to built-in Windows tooling, or your environment does not want an extra package manager, WinGet and incremental installation are both perfectly valid.
If you want a quick rule of thumb, choose like this:
- You are setting up a Windows machine from scratch and want one clean package-manager flow: choose Scoop.
- You want to stay closer to native Windows tooling: choose WinGet.
- You already have PowerShell 7, Git, and Python 3.11: only add
uv, or keep using thepipxsetup you already trust.
Path A: Use Scoop to organise the whole workstation in one go
If you want the neatest all-in-one route, Scoop is still a very practical choice. Open Windows PowerShell and paste:
# First, allow local scripts for the current user
Set-ExecutionPolicy -ExecutionPolicy RemoteSigned -Scope CurrentUser -Force

# Install the Scoop package manager
Invoke-RestMethod -Uri https://get.scoop.sh | Invoke-Expression

# Add the source bucket and install the core tools
scoop bucket add extras
scoop install pwsh git uv ripgrep nvm
scoop install extras/windows-terminal

# Refresh uv's shell path and let PATH changes land sooner
uv tool update-shell
Stop-Process -Name explorer -Force; Start-Process explorer
The attraction of this path is simple: most of the tools this article relies on can be brought into the same room at once.
Path B: Use WinGet and official packages
If you prefer to stay inside the built-in Windows package-management world, WinGet works well. For Spec Kit, this changes the shape of the route, but not the destination. What matters is that you end up with uv, Git, PowerShell 7, and a usable terminal.
# Install the core tools with Windows' built-in package manager
winget install --id Microsoft.PowerShell -e
winget install --id Git.Git -e
winget install --id astral-sh.uv -e
winget install --id Microsoft.WindowsTerminal -e
winget install --id OpenJS.NodeJS.LTS -e
If Node version switching matters to you more than simply having one stable LTS installation, you can replace the last line with nvm for Windows instead:
winget install --id CoreyButler.NVMforWindows -e
Path C: You already have the basics and only want the minimum
If your machine already has PowerShell 7, Git, Python 3.11, and a stable workflow, there is no need to rebuild the entire desk just for Spec Kit. In that case, adding uv, or reusing the pipx setup you already trust, is enough.
# Add uv only, then install the Spec Kit CLI directly
winget install --id astral-sh.uv -e
uv tool install specify-cli --from git+https://github.com/github/spec-kit.git@v0.8.1
If you already have pipx, this path also remains valid:
pipx install git+https://github.com/github/spec-kit.git@v0.8.1
The uv project also provides a standalone installer and downloadable GitHub Release binaries. So if both Scoop and WinGet are awkward in your environment, there is still another door. It is just a quieter one, and you walk it with a little more intention.
Step 2: Whichever path you chose, move into PowerShell 7
Close the old window, open Windows Terminal, and run:
pwsh
Then confirm that you have really left 5.1 behind:
$PSVersionTable.PSVersion
pwsh --version
This step matters. The official Spec Kit docs explicitly note that some Windows flows depend on PowerShell 7+, not the old Windows PowerShell 5.x environment.
Step 3: Let your Node.js choice match the route you took
Many AI coding tools still touch Node.js somewhere along the way, so you should keep one stable version available. Whether that means nvm or a direct LTS install depends on the path you chose above.
If you chose the Scoop route, or you know you will switch Node versions later, continue with nvm:
nvm install lts
nvm use lts
If you chose the WinGet route and only need a stable Node.js LTS, then winget install --id OpenJS.NodeJS.LTS -e from the previous step is already enough. In that case, you do not need to add nvm unless version switching becomes part of your life later.
Step 4: Install the AI coding agent CLI you actually plan to use
If you use GitHub Copilot CLI:
npm install -g @github/copilot
If you use Claude Code:
npm install -g @anthropic-ai/claude-code
You do not need both, but specify check should be able to see the one you intend to work with.
Step 5: Install the Spec Kit specify CLI
The source matters here. The official Spec Kit README is explicit: the maintained official packages are installed from the GitHub repository itself, not from arbitrary similarly named packages on PyPI.
This is also the right place to untangle one easy confusion: Scoop is not a required way to install Spec Kit itself. Scoop is only one Windows-friendly way to obtain uv. The commands that actually install the Spec Kit CLI are still the uv tool install ... or pipx install ... commands below.
At the time of writing, v0.8.1 is the stable release used in the examples below:
uv tool install specify-cli --from git+https://github.com/github/spec-kit.git@v0.8.1
If you prefer pipx, this also works:
pipx install git+https://github.com/github/spec-kit.git@v0.8.1
If you only want one-shot usage without keeping the CLI installed, use uvx:
uvx --from git+https://github.com/github/spec-kit.git@v0.8.1 specify init --here --integration copilot
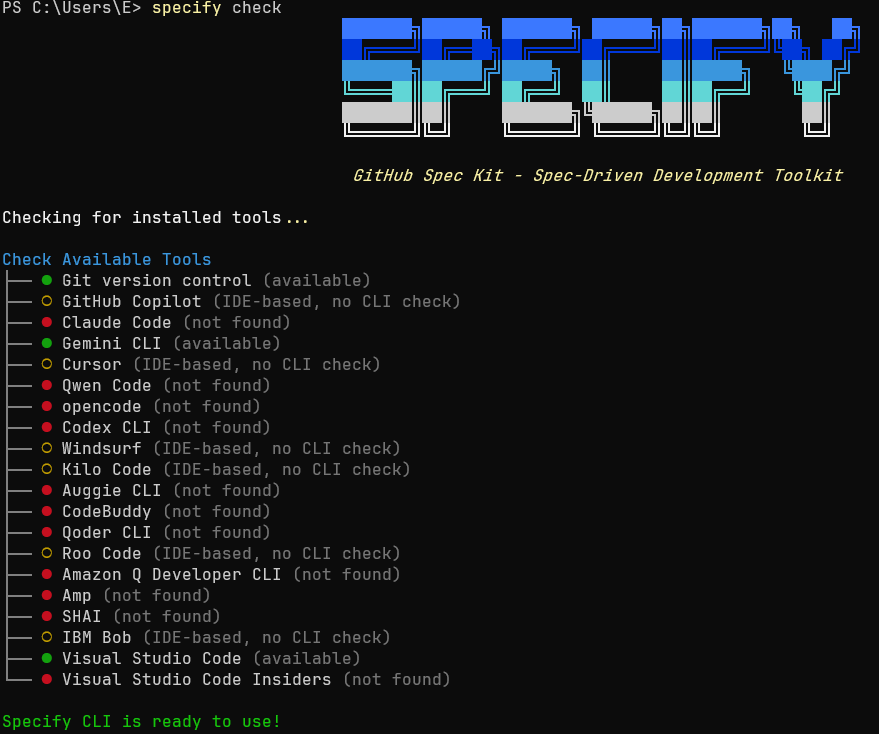
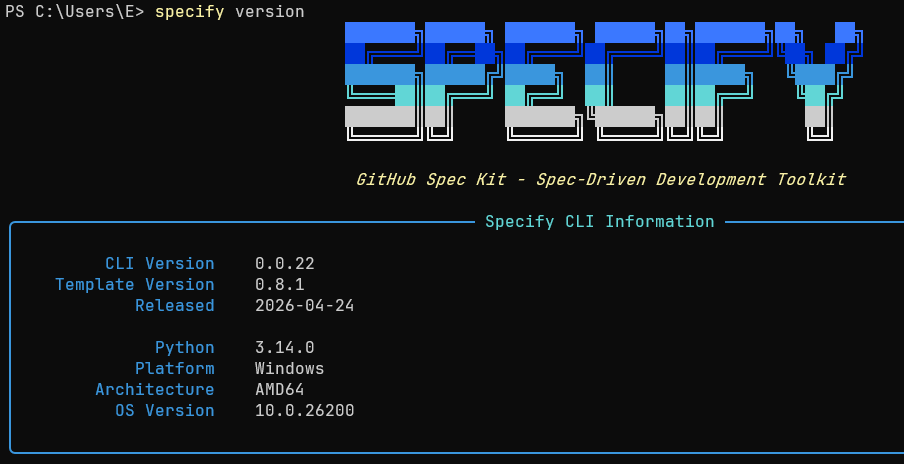
Step 6: Verify the environment
specify version
specify check
When Git version control is green and at least one AI coding tool you intend to use is green, the path is usually stable enough to continue.
What Spec Kit actually adds after installation
When people first see uv tool install specify-cli ..., they often assume they have only added one more executable to PATH. That is not really the useful part. The visible changes begin when you run specify init against a repository.
Create a new project
specify init my-project --integration copilot
Initialise inside an existing repository
specify init --here --integration copilot
What you will typically see afterwards
| Path or capability | Purpose |
|---|---|
.specify/ |
The core Spec Kit directory for templates, scripts, and shared memory |
.github/prompts/, .claude/commands/, and similar folders |
Agent-specific prompt or command files |
/speckit.constitution |
Create project principles and governance |
/speckit.specify |
Turn needs into specifications |
/speckit.plan |
Turn specifications into technical plans |
/speckit.tasks |
Break plans into actionable tasks |
/speckit.implement |
Execute the implementation phase |
If you want to inspect which integrations your installed version supports, run:
specify integration list
The key idea is this: Spec Kit is not just a CLI installation. It is a reusable SDD scaffold that enters the repository with you.
How to upgrade an existing installation
If you installed Spec Kit earlier and the official project has kept moving, separate these two actions in your mind:
- Upgrading the
specifyCLI on your machine. - Refreshing the
.specify/files, templates, and agent commands inside an existing repository.
They are related, but they are not the same action.
Scenario 1: I only want to upgrade the CLI
If you originally installed it with uv tool install:
uv tool install specify-cli --force --from git+https://github.com/github/spec-kit.git@v0.8.1
specify check
If you originally installed it with pipx:
pipx install --force git+https://github.com/github/spec-kit.git@v0.8.1
specify check
If you have only ever used uvx, then there is no persistent CLI to upgrade. You simply run the next command against the newer release tag:
uvx --from git+https://github.com/github/spec-kit.git@v0.8.1 specify init --here --integration copilot
Scenario 2: I need to refresh the Spec Kit files inside my repository
The official upgrade guide is very clear here: specify init --here --force updates templates, scripts, and command files, and there is a known risk that .specify/memory/constitution.md may be overwritten by the default template. If you customised your constitution, templates, or scripts, back them up first.
Back them up:
Copy-Item .specify/memory/constitution.md .specify/memory/constitution-backup.md
Copy-Item .specify/templates .specify/templates-backup -Recurse
Copy-Item .specify/scripts .specify/scripts-backup -Recurse
Then refresh the project files:
specify init --here --force --integration copilot
If you only need to restore your own constitution immediately afterwards:
Move-Item .specify/memory/constitution-backup.md .specify/memory/constitution.md -Force
If the repository is under Git and your constitution was committed earlier, restoring from Git is also fine:
git restore .specify/memory/constitution.md
What is usually safe, and what deserves caution
According to the official upgrade guide, these are generally safe:
- The
specs/directory, includingspec.md,plan.md, andtasks.md. - Your application source code.
- Your Git history.
The areas that deserve caution are the shared infrastructure files:
.specify/memory/constitution.md.specify/templates/.specify/scripts/
It helps to think of upgrades as refreshing the scaffold, not rewriting the life of the project.
The PowerShell commands worth learning on the way
Since PowerShell is a supporting actor in this article rather than the headline act, there is no need to learn too much at once. The commands below are enough to support the installation and upgrade flow you just walked through.
1. Check versions
$PSVersionTable.PSVersion
node --version
uv --version
git --version
2. Check whether a command exists
Get-Command specify
Get-Command pwsh
Get-Command uv
3. Check whether a path or file exists
Test-Path .specify
Test-Path .specify/memory/constitution.md
4. Use a pipeline and select fields
Get-Command pwsh, git, uv, node |
    Select-Object Name, Source
5. Ask for help
Get-Help Test-Path
Get-Help Copy-Item
If you want the deeper PowerShell 7 material, including version differences, profile setup, and modern operators, the companion PowerShell article under the same tag is still the right next stop. This piece is intentionally narrower. Its first responsibility is to get the SDD toolchain in place.
What PowerShell, uv, and pipx each are
By now, one question usually remains: if all these commands are being typed inside PowerShell, why do uv, pipx, and specify still feel separate? Are they all part of PowerShell?
They are not.
In a more visual metaphor, PowerShell is the room where you speak, uv and pipx are the workers who bring tools into that room, and specify is the tool you actually want to use. The room is not the worker. The worker is not the tool. They simply happen to meet in the same place.
More precisely:
| Name | Identity | Role in this article |
|---|---|---|
PowerShell |
Shell / command-line environment | The place where you type commands and run scripts |
uv |
Python package, project, and tool manager | The main recommended path for installing and running specify-cli |
pipx |
Python CLI installer | An alternative to uv, installing CLI apps into isolated environments and exposing them on PATH |
specify |
The Spec Kit CLI | Handles init, check, version, and the main SDD setup flow |
The scope of uv is much larger than pipx. It manages Python versions, virtual environments, project dependencies, and tool execution. pipx is more focused. It shines when you simply want a clean, isolated installation of an end-user Python application.
Within the Spec Kit context, I would still keep uv on the main path because the official docs do the same. But understanding where pipx belongs makes the whole landscape feel much less crowded.
Verification and further reading
At this point, the most useful thing is not to install more. It is to stop and see whether the environment has become quiet enough to trust. This small set of commands is the last light on the road:
pwsh --version
git --version
uv --version
node --version
rg --version
specify version
specify check
If they all answer cleanly, then the SDD toolchain on your Windows machine has a working skeleton. From there, whether you initialise a new repository or refresh an existing .specify/ setup, the route is finally clear.
And if you finish this article and realise what you really want next is a deeper understanding of PowerShell 7 itself, including version differences, profile setup, and more modern shell thinking, the companion PowerShell article under the same tag remains the natural next read. This article is the road at night, with the lamps turned on one by one. That other piece is what happens when you begin opening the rooms beside it.
If the CLI really breaks: refresh from the release zip
Sometimes the problem is not your repository at all, but the CLI syntax, the pinned release tag, or the local installation state. In that case, the practical move is usually not to keep guessing commands. Go back to the official github/spec-kit repository, open the Releases page, and check the latest tag, for example v0.8.5. If you only suspect that the version string in an older command example has fallen behind, replacing the tag with the latest release is often enough.
If the CLI still refuses to cooperate, the release zip is still useful. It is not always the cleanest way to reinstall the Python CLI itself, but it is a practical way to refresh the shared scaffold inside a repository. If your real goal is a fully offline CLI installation, the official wheel-bundle / air-gapped path is still the stricter answer. But if what you need right now is to recover the Spec Kit files inside a project, this order works well:
- Download
Source code (zip)from the release page and extract it into a temporary folder. - Back up anything you have customised already, especially
.specify/memory/constitution.md,.specify/templates/,.specify/scripts/, and the command folder for the agent you use. - Copy the extracted
templates/directory into.specify/templates/, then copy the extractedscripts/directory into.specify/scripts/. This is the part that most closely matches whatspecify init --here --forcenormally refreshes for you.
Expand-Archive .\spec-kit-0.8.5.zip -DestinationPath .\spec-kit-0.8.5
New-Item -ItemType Directory -Force -Path .\.specify\templates, .\.specify\scripts | Out-Null
Copy-Item .\spec-kit-0.8.5\templates\* .\.specify\templates\ -Recurse -Force
Copy-Item .\spec-kit-0.8.5\scripts\* .\.specify\scripts\ -Recurse -Force
- If the agent command files are also broken, use the extracted
templates/commands/directory as the source and rebuild the command files in the format your integration expects. In common cases, Copilot default mode reads.github/agents/speckit.<command>.agent.mdand also expects matching.github/prompts/speckit.<command>.prompt.md; Claude reads.claude/commands/speckit.<command>.md; Gemini reads.gemini/commands/speckit.<command>.toml. - When you copy command templates manually, rewrite any
templates/andscripts/references inside them to.specify/templates/and.specify/scripts/. The reason is simple: the source zip contains the raw templates, not always the final editor-ready files. - If you use Copilot, do not forget the
.prompt.mdcompanion files. They are essentially tiny frontmatter pointers to the matching agent command, so if one is missing, you can recreate it with the correspondingagent: speckit.<command>value. - Restart the IDE / editor, verify that the command directory really refreshed, and restore your own constitution file if you backed it up.
This route is a fallback, not the first choice. But when the release has moved on, the pinned tag in an article is behind, or the local CLI simply refuses to behave, refreshing the scaffold directly from the release zip is often the fastest way to bring a repository back to a usable state.